Security Settings
Permit Access during the first Take Control Connection
The first time you initiate a Take Control connection to a remote Mac running macOS 10.14 or later, the remote user receives an Accessibility Access (Events) prompt. From macOS 10.15 they will also receive a Screen Recording prompt.
These prompts only display once per app during the first connection attempt, even if the app is uninstalled then reinstalled.
Accessibility Access (Events)
To permit remote control on computers running macOS 10.14 and later, the remote admin rights user should follow the below steps in the Accessibility Access (Events) prompt.
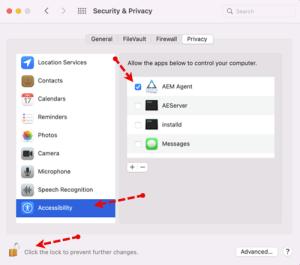
- Click Open System Preferences to open Security & Privacy > Privacy > Accessibility.
- Click on the padlock in the bottom left corner to unlock and allow changes.
- Enter the computer's administrative account credentials when prompted.
- Tick the check box against the required Take Control solutions.
- Close the Security & Privacy window.
Screen Recording
To allow Take Control to record the screen on computers running macOS 10.15 and later, the remote admin rights should follow the below steps in the Screen Recording prompt.
- Click Open System Preferences to open Security & Privacy > Privacy > Screen Recording.
- Click on the padlock in the bottom left corner to unlock and allow changes.
- Enter the computer's administrative account credentials when prompted.
- Tick the check box against the required Take Control solutions.
- Close the Security & Privacy window.
Full Disk Access
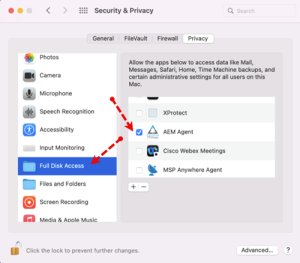
This prompt may appear to the remote user when Take Control attempts to interact with files on their computer, for example during a file transfer. To allow this Take Control interaction, the remote admin rights user should follow the below steps in the Full Disk Access prompt.
- Click Open System Preferences to open Security & Privacy > Privacy > Full Disk Access.
- Click on the padlock in the bottom left corner to unlock and allow changes.
- Enter the computer's administrative account credentials when prompted.
- Tick the check box against the required Take Control solutions.
- Close the Security & Privacy window.
Permit Access through the Security & Privacy Settings
Where the prompts did not appear, or the user wishes to change their selected option (for example they accidentally opted for Deny rather than Allow), they can reconfigure their settings in Security and Privacy.
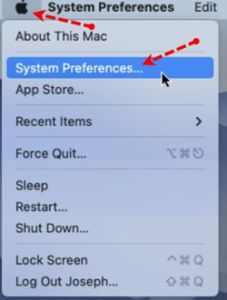
- Go to System Preferences > Security & Privacy > Privacy then Accessibility, Screen Recording or Full Disk Access.
- Click on the padlock in the bottom left corner to unlock and allow changes.
- Enter the computer's administrative account credentials when prompted.
- Tick the check box against your Take Control solutions.
- If the required Take Control solution is installed on the computer but not displayed in the main window.
- Click the plus icon below the main window.
- Use Finder to navigate to your Applications folder.
- Select your Take Control solution.
- Click Open.
- Your Take Control solution should now appear in the main window for selection.
- Close the Security & Privacy window.
Example of the Accessibility Access (Events) prompt and related Security & Privacy dialog.